> For the complete documentation index, see [llms.txt](https://help.botpenguin.com/llms.txt). Markdown versions of documentation pages are available by appending `.md` to page URLs; this page is available as [Markdown](https://help.botpenguin.com/~/changes/483/platform-guidelines-and-training/must-know-how-of-botpenguin/support-agent-guide.md).

# Support Agent guide

This page contains all the necessary information regarding the live chat, how a agent can use that functionality in detail.

## Glossary:

| Title           | Meaning                                                                                                                       |
| --------------- | ----------------------------------------------------------------------------------------------------------------------------- |
| Tags            | Tags are used to assign a specific label or category to a chat                                                                |
| Status          | The Status of each chat is a key feature for both individual agents and teams to track the current state of each conversation |
| Team Member     | The agents who are interacting with the users other then admin.                                                               |
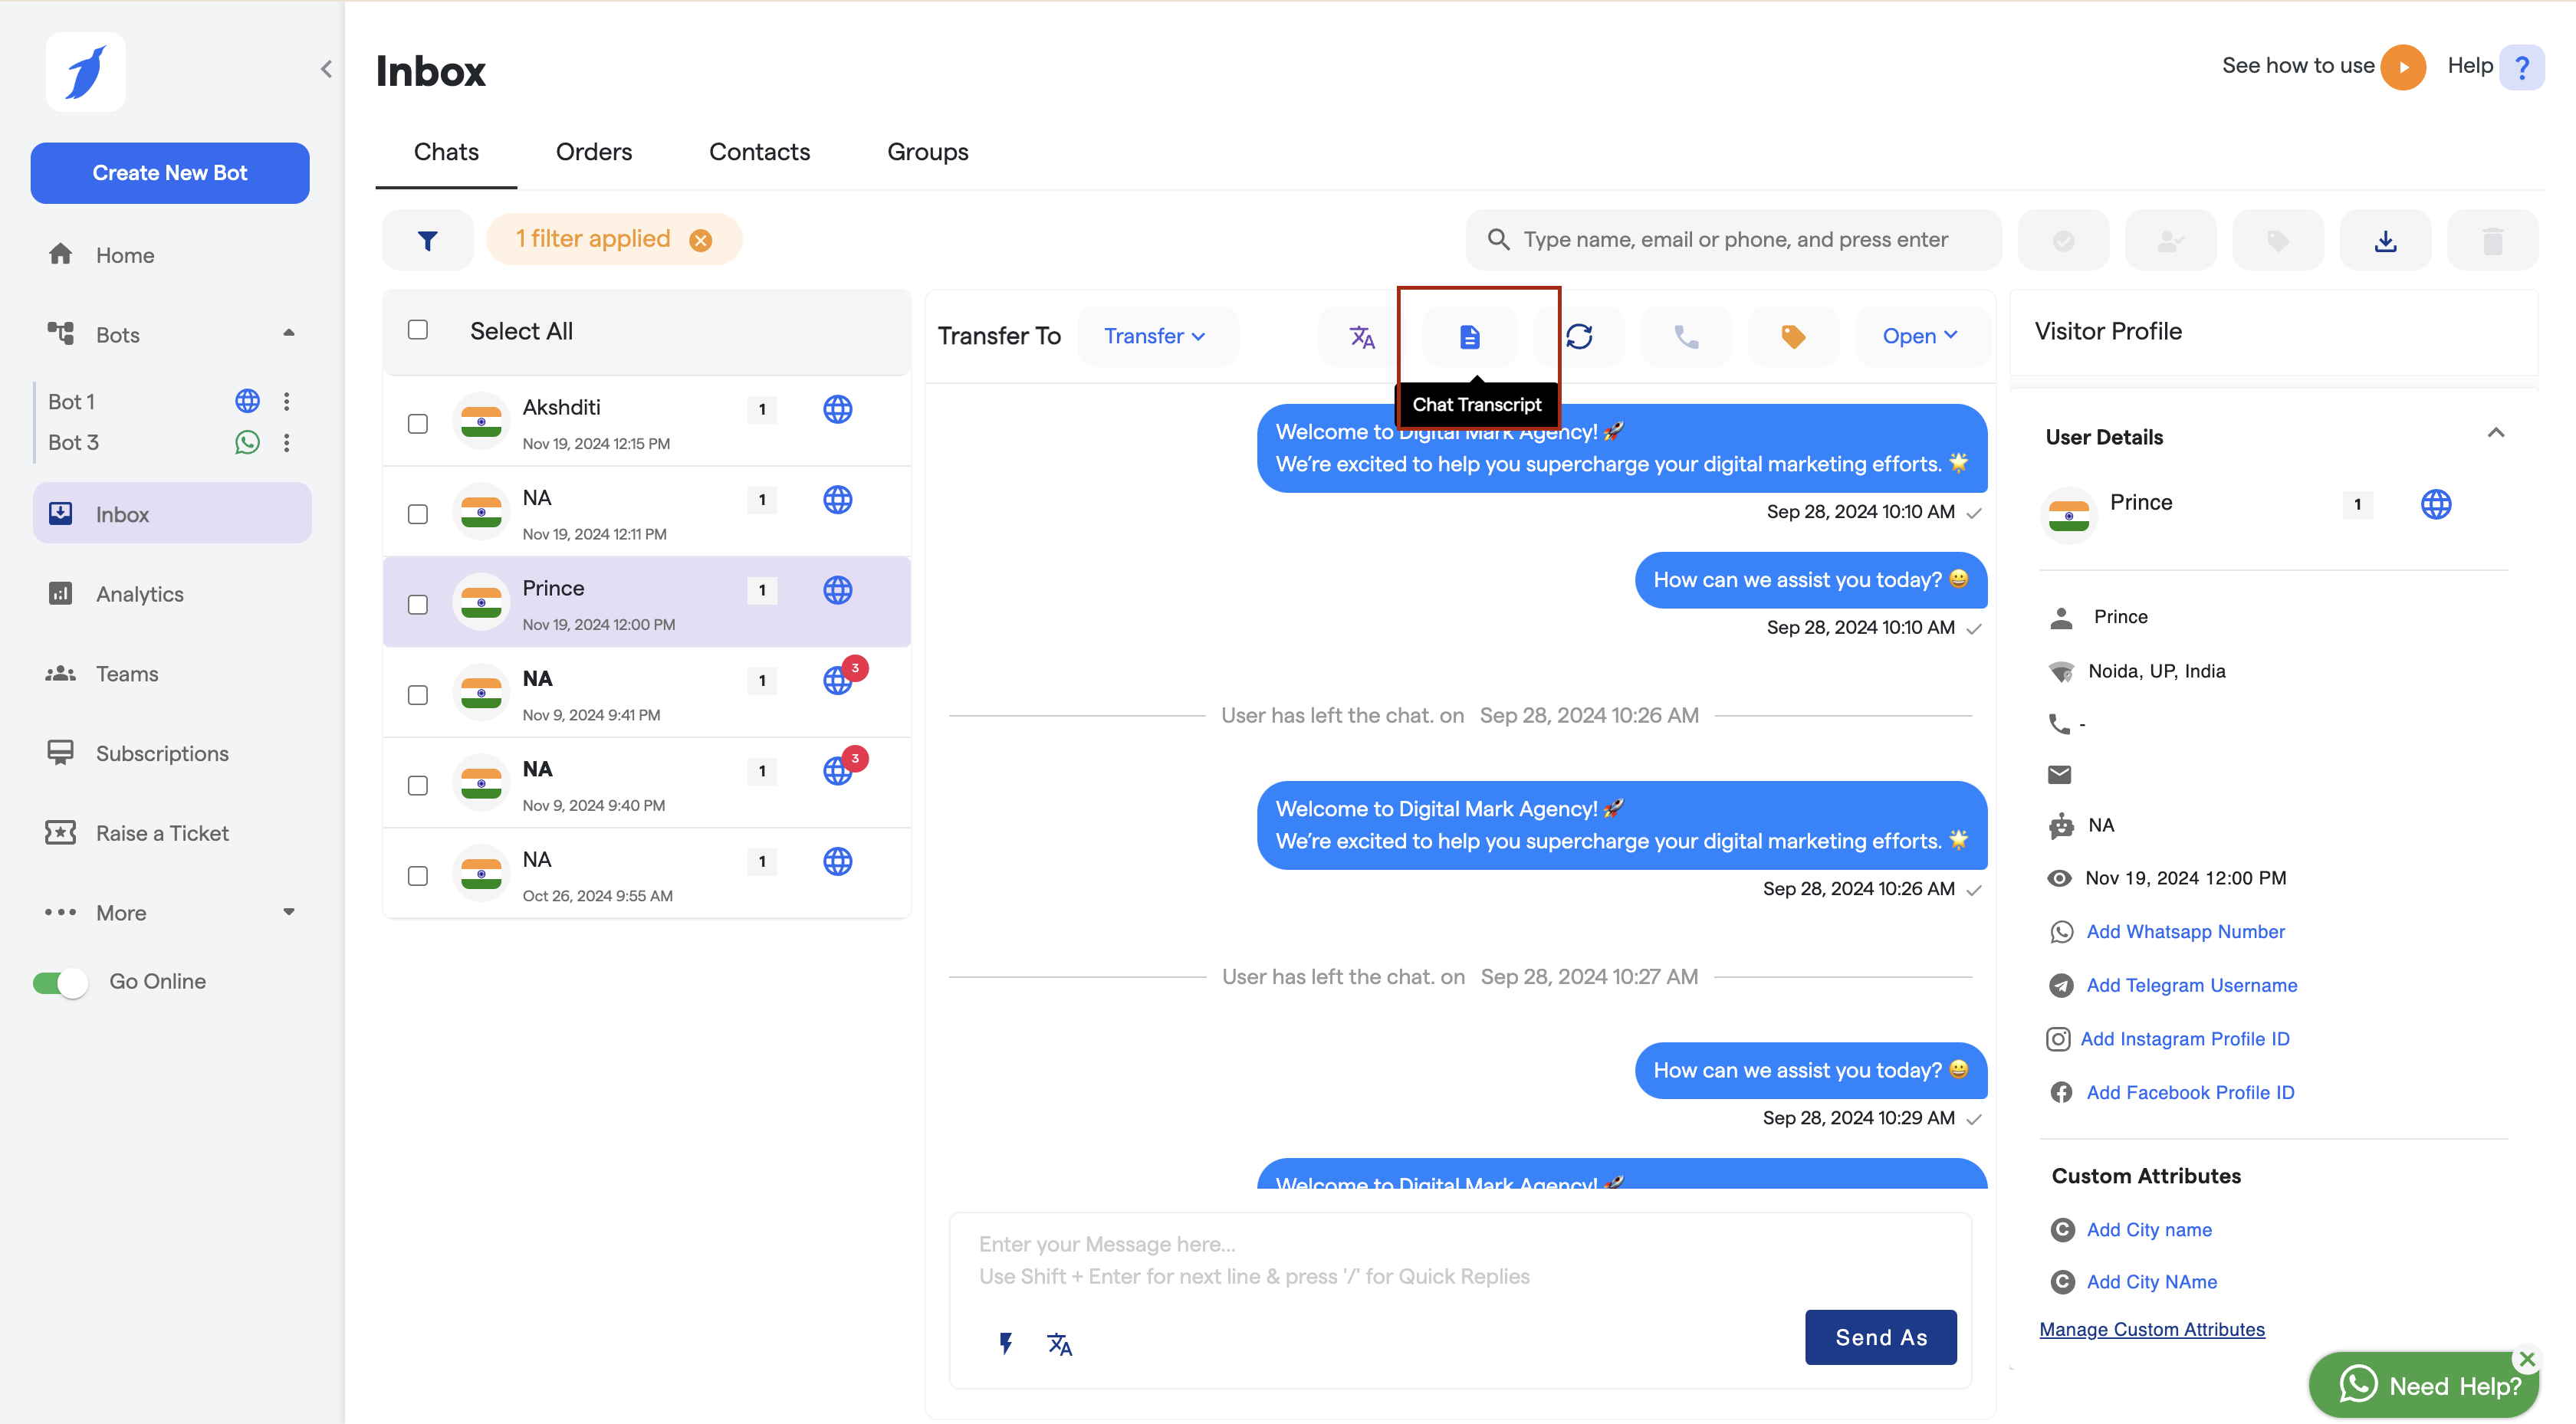
| Chat Transcript | The  document file of the  chat between the user and  bot that can be downloaded                                              |

## **Step 1: Logging In**

To begin using the live chat functionality, the agent must first be added as a member by the admin. The admin will provide the necessary credentials.&#x20;

**Note : If you haven’t received them, please contact the admin to get access.**<br>

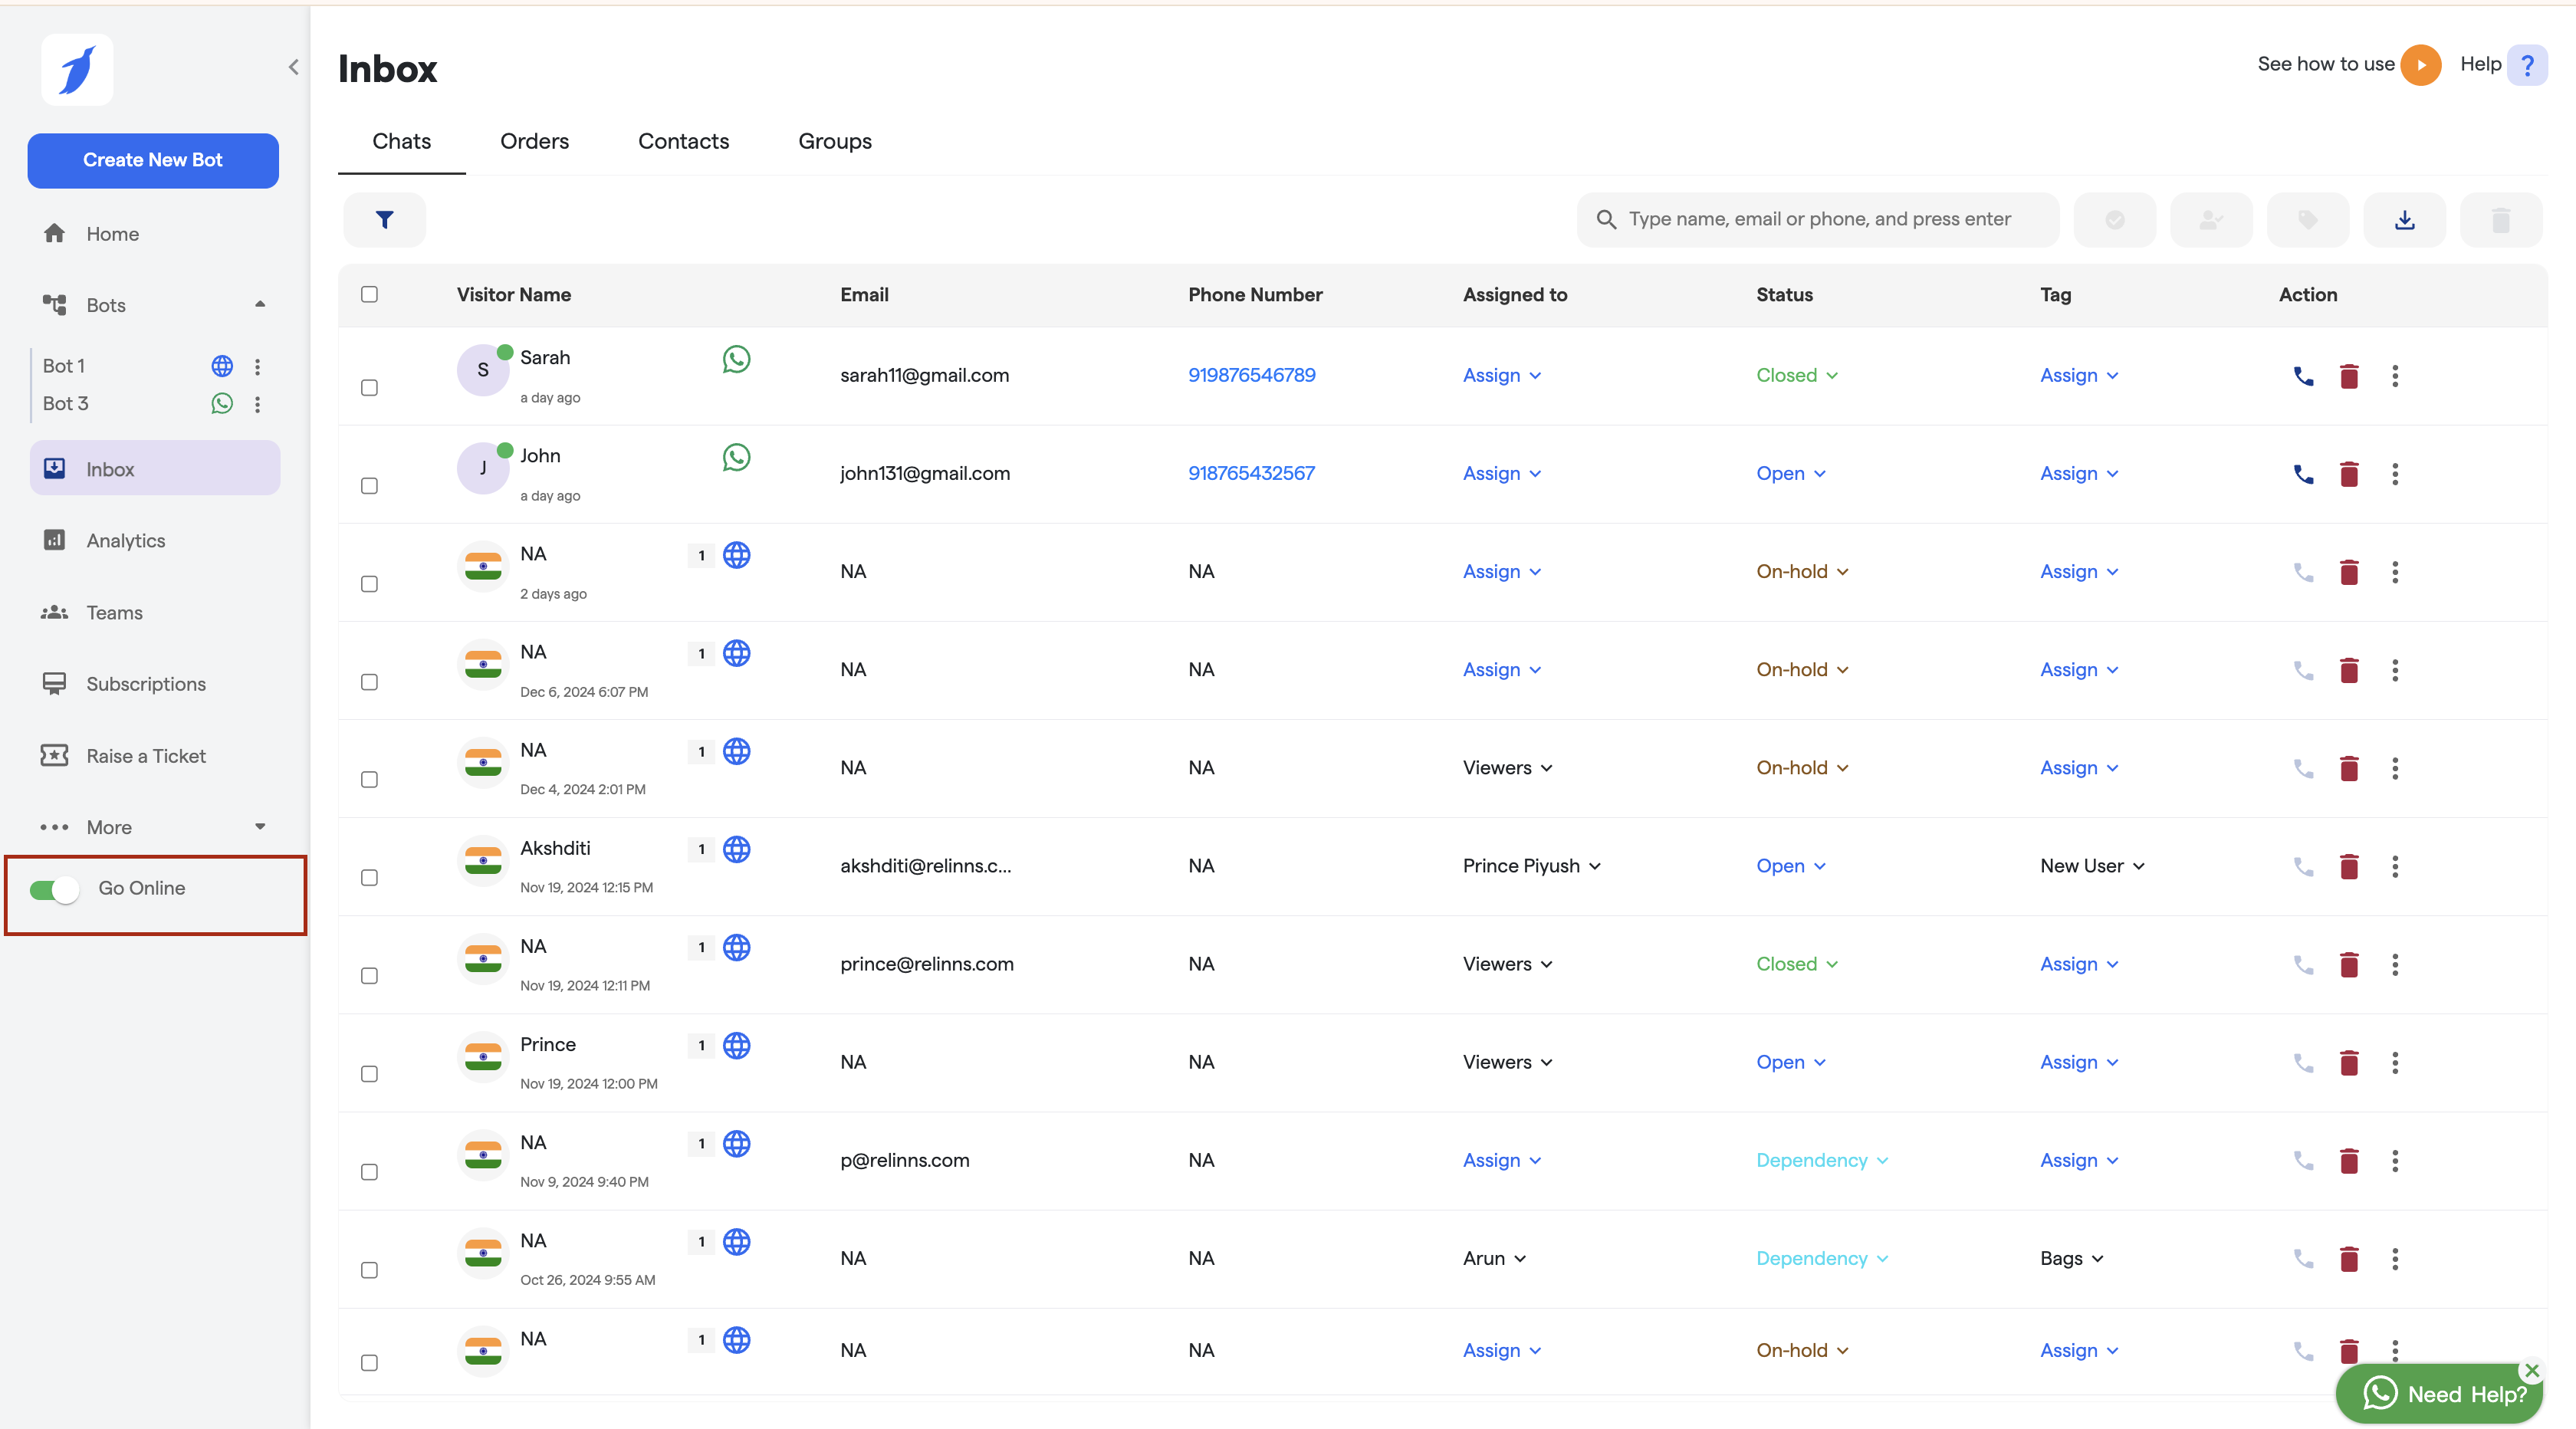
As soon as you log in to the page, you'll see the **"Go Online"** button on the left-hand side. You can enable or disable this button based on whether you want to be available for live chat.

<figure><img src="https://1745791824-files.gitbook.io/~/files/v0/b/gitbook-x-prod.appspot.com/o/spaces%2FAPDb8cKQtGlIAfgHjcsQ%2Fuploads%2FXDGUdmZKHp5ircQlHVb3%2Fimage.png?alt=media&amp;token=c463db5e-9e26-4ed3-9f71-a2dce8dd30c9" alt=""><figcaption><p>Inbox</p></figcaption></figure>

* **Toggle ON:** Indicates you are online and available to attend live chats.
* **Toggle OFF:** Indicates you are offline and unavailable to handle live chats.

### **Step 2: Accessing the Inbox**

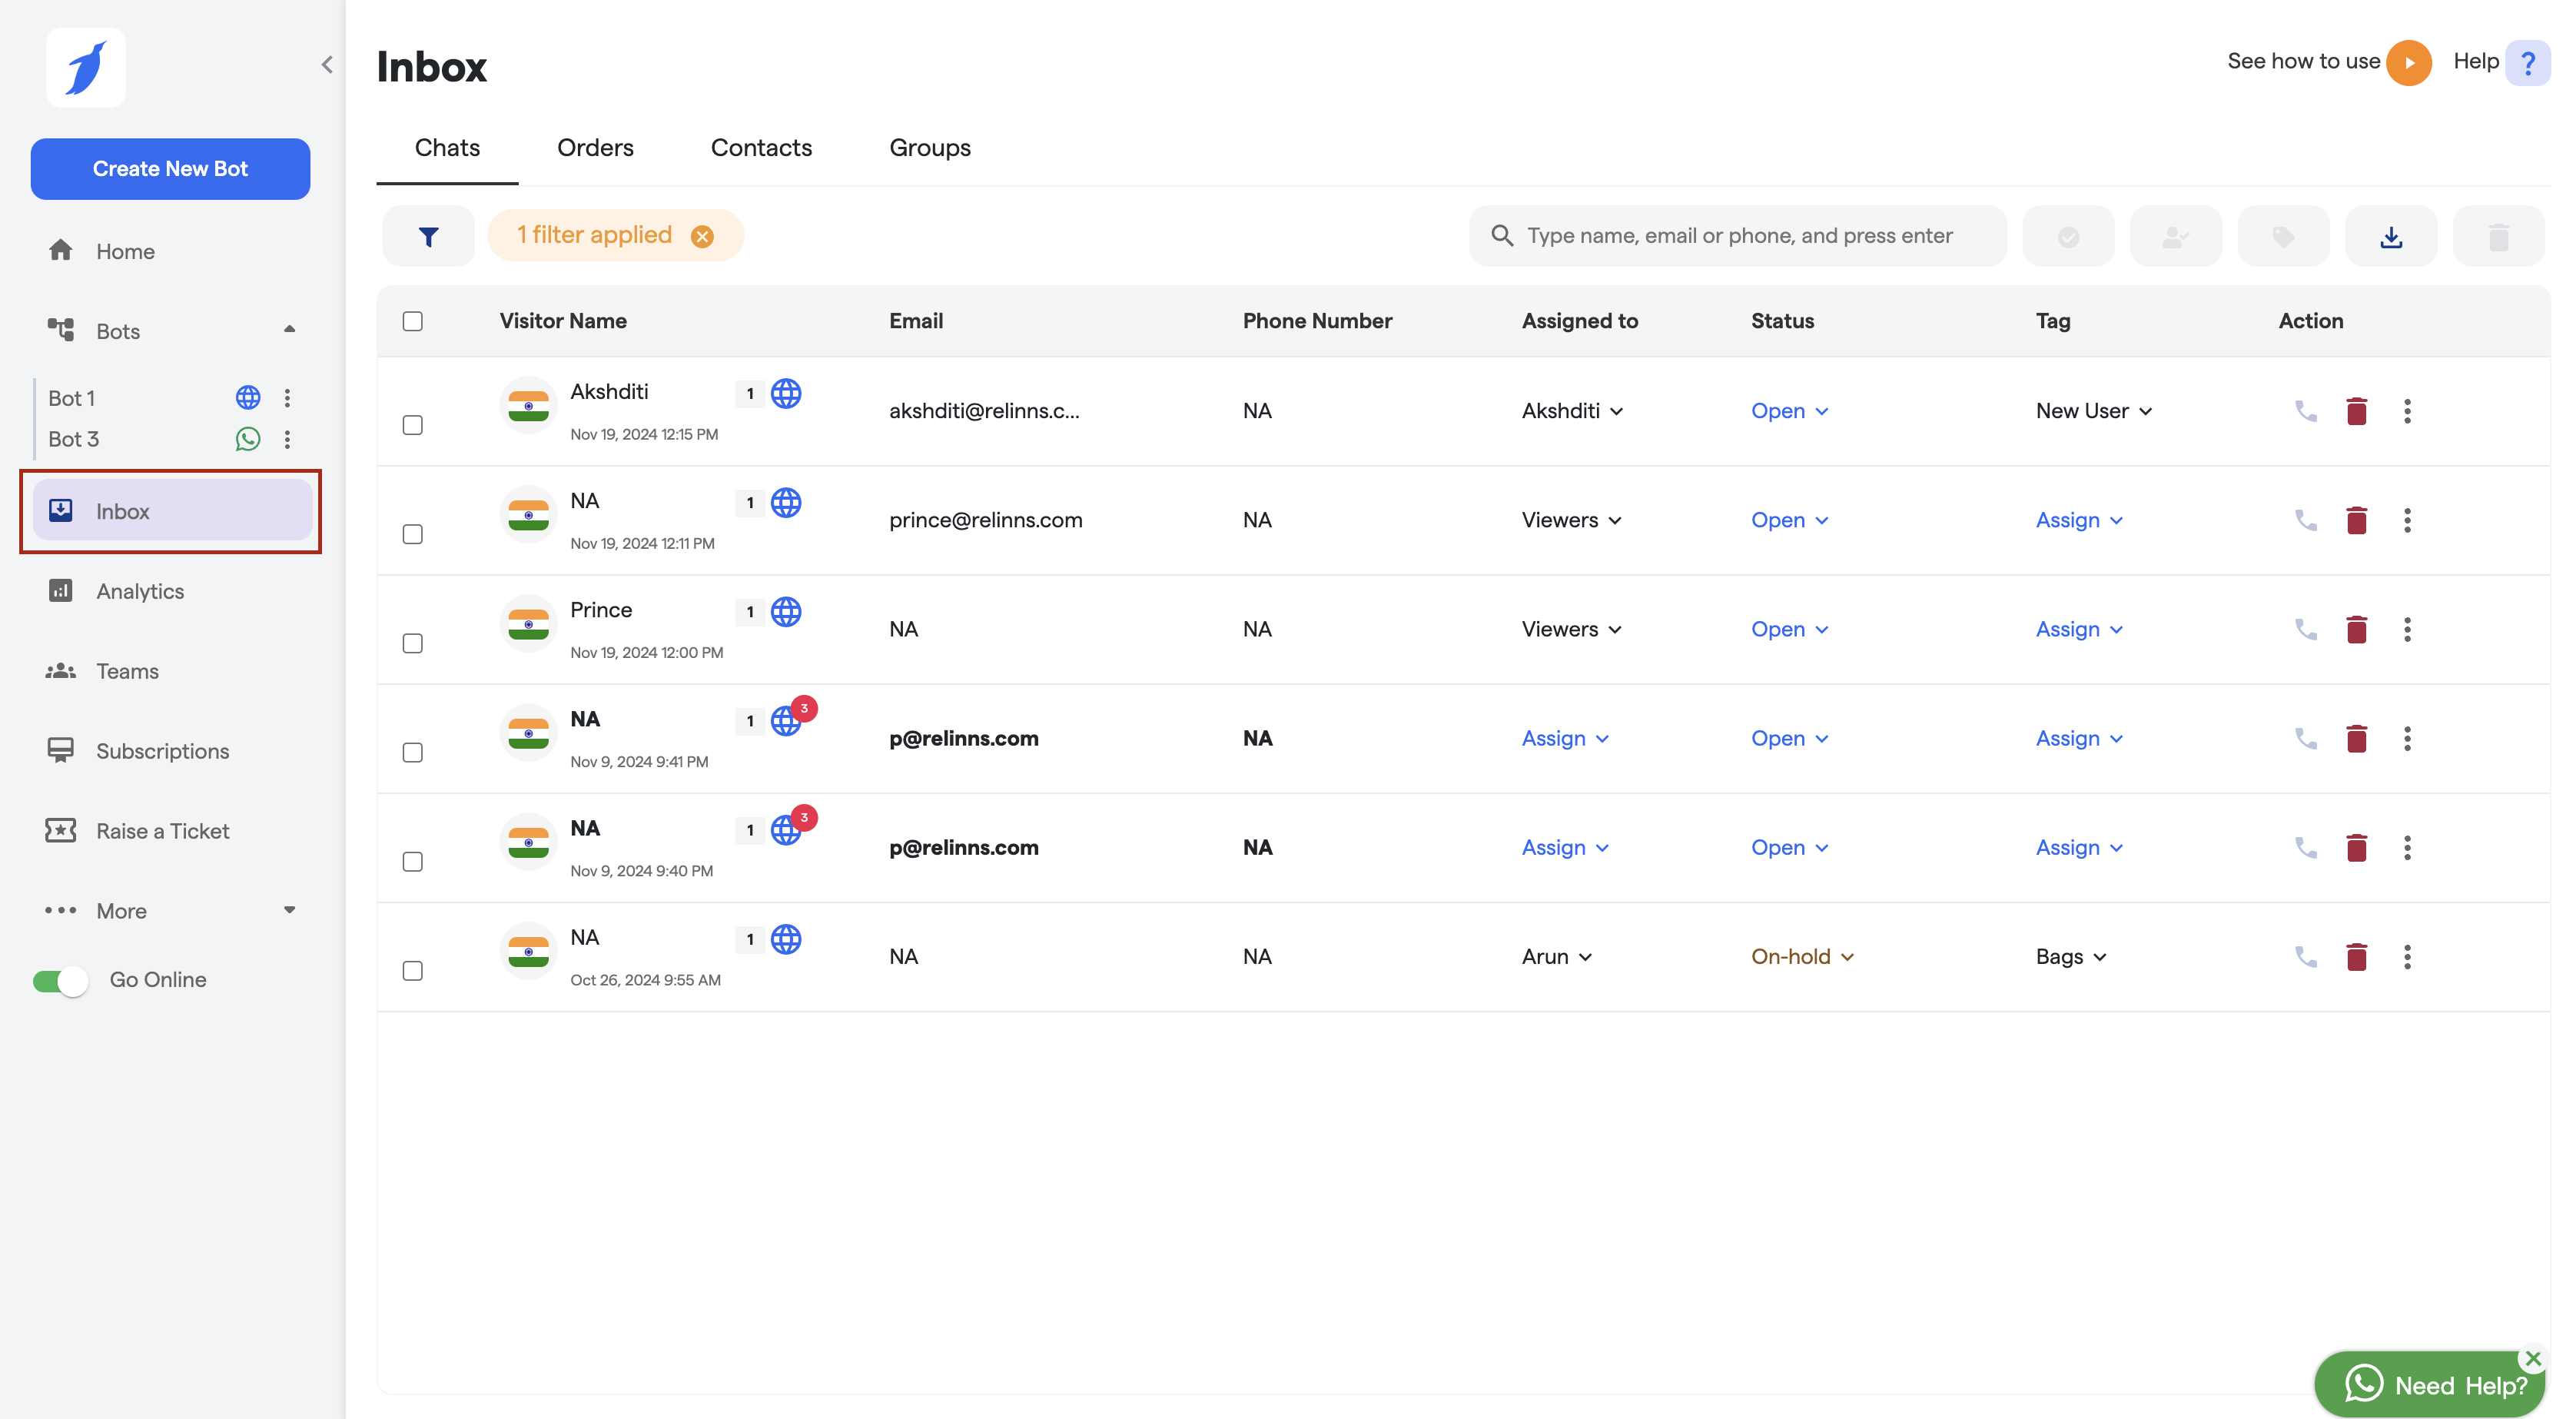
Once you log in "**Inbox**" , you will land up on the below shown page.

<figure><img src="https://1745791824-files.gitbook.io/~/files/v0/b/gitbook-x-prod.appspot.com/o/spaces%2FAPDb8cKQtGlIAfgHjcsQ%2Fuploads%2FbTMbjcHwzlAKzi1xHnJ6%2Fimage.png?alt=media&amp;token=84385e16-b88b-45a9-bba3-82abf53274aa" alt=""><figcaption><p>Inbox</p></figcaption></figure>

&#x20;This is where all the leads and chats from various platforms are listed. In the inbox, you will see following columns:

* **Visitor’s name** - It is the name of the lead who interacted with the bot.
* **Email address** - The email-id of the customer(if provided).
* **Phone number** - The phone number of the customer(if provided).

<figure><img src="https://1745791824-files.gitbook.io/~/files/v0/b/gitbook-x-prod.appspot.com/o/spaces%2FAPDb8cKQtGlIAfgHjcsQ%2Fuploads%2FVuDES3osnZc2o3aeJd2g%2Fimage.png?alt=media&amp;token=ab77bfae-07a1-4c9e-89a4-892e485db37a" alt=""><figcaption><p>Inbox</p></figcaption></figure>

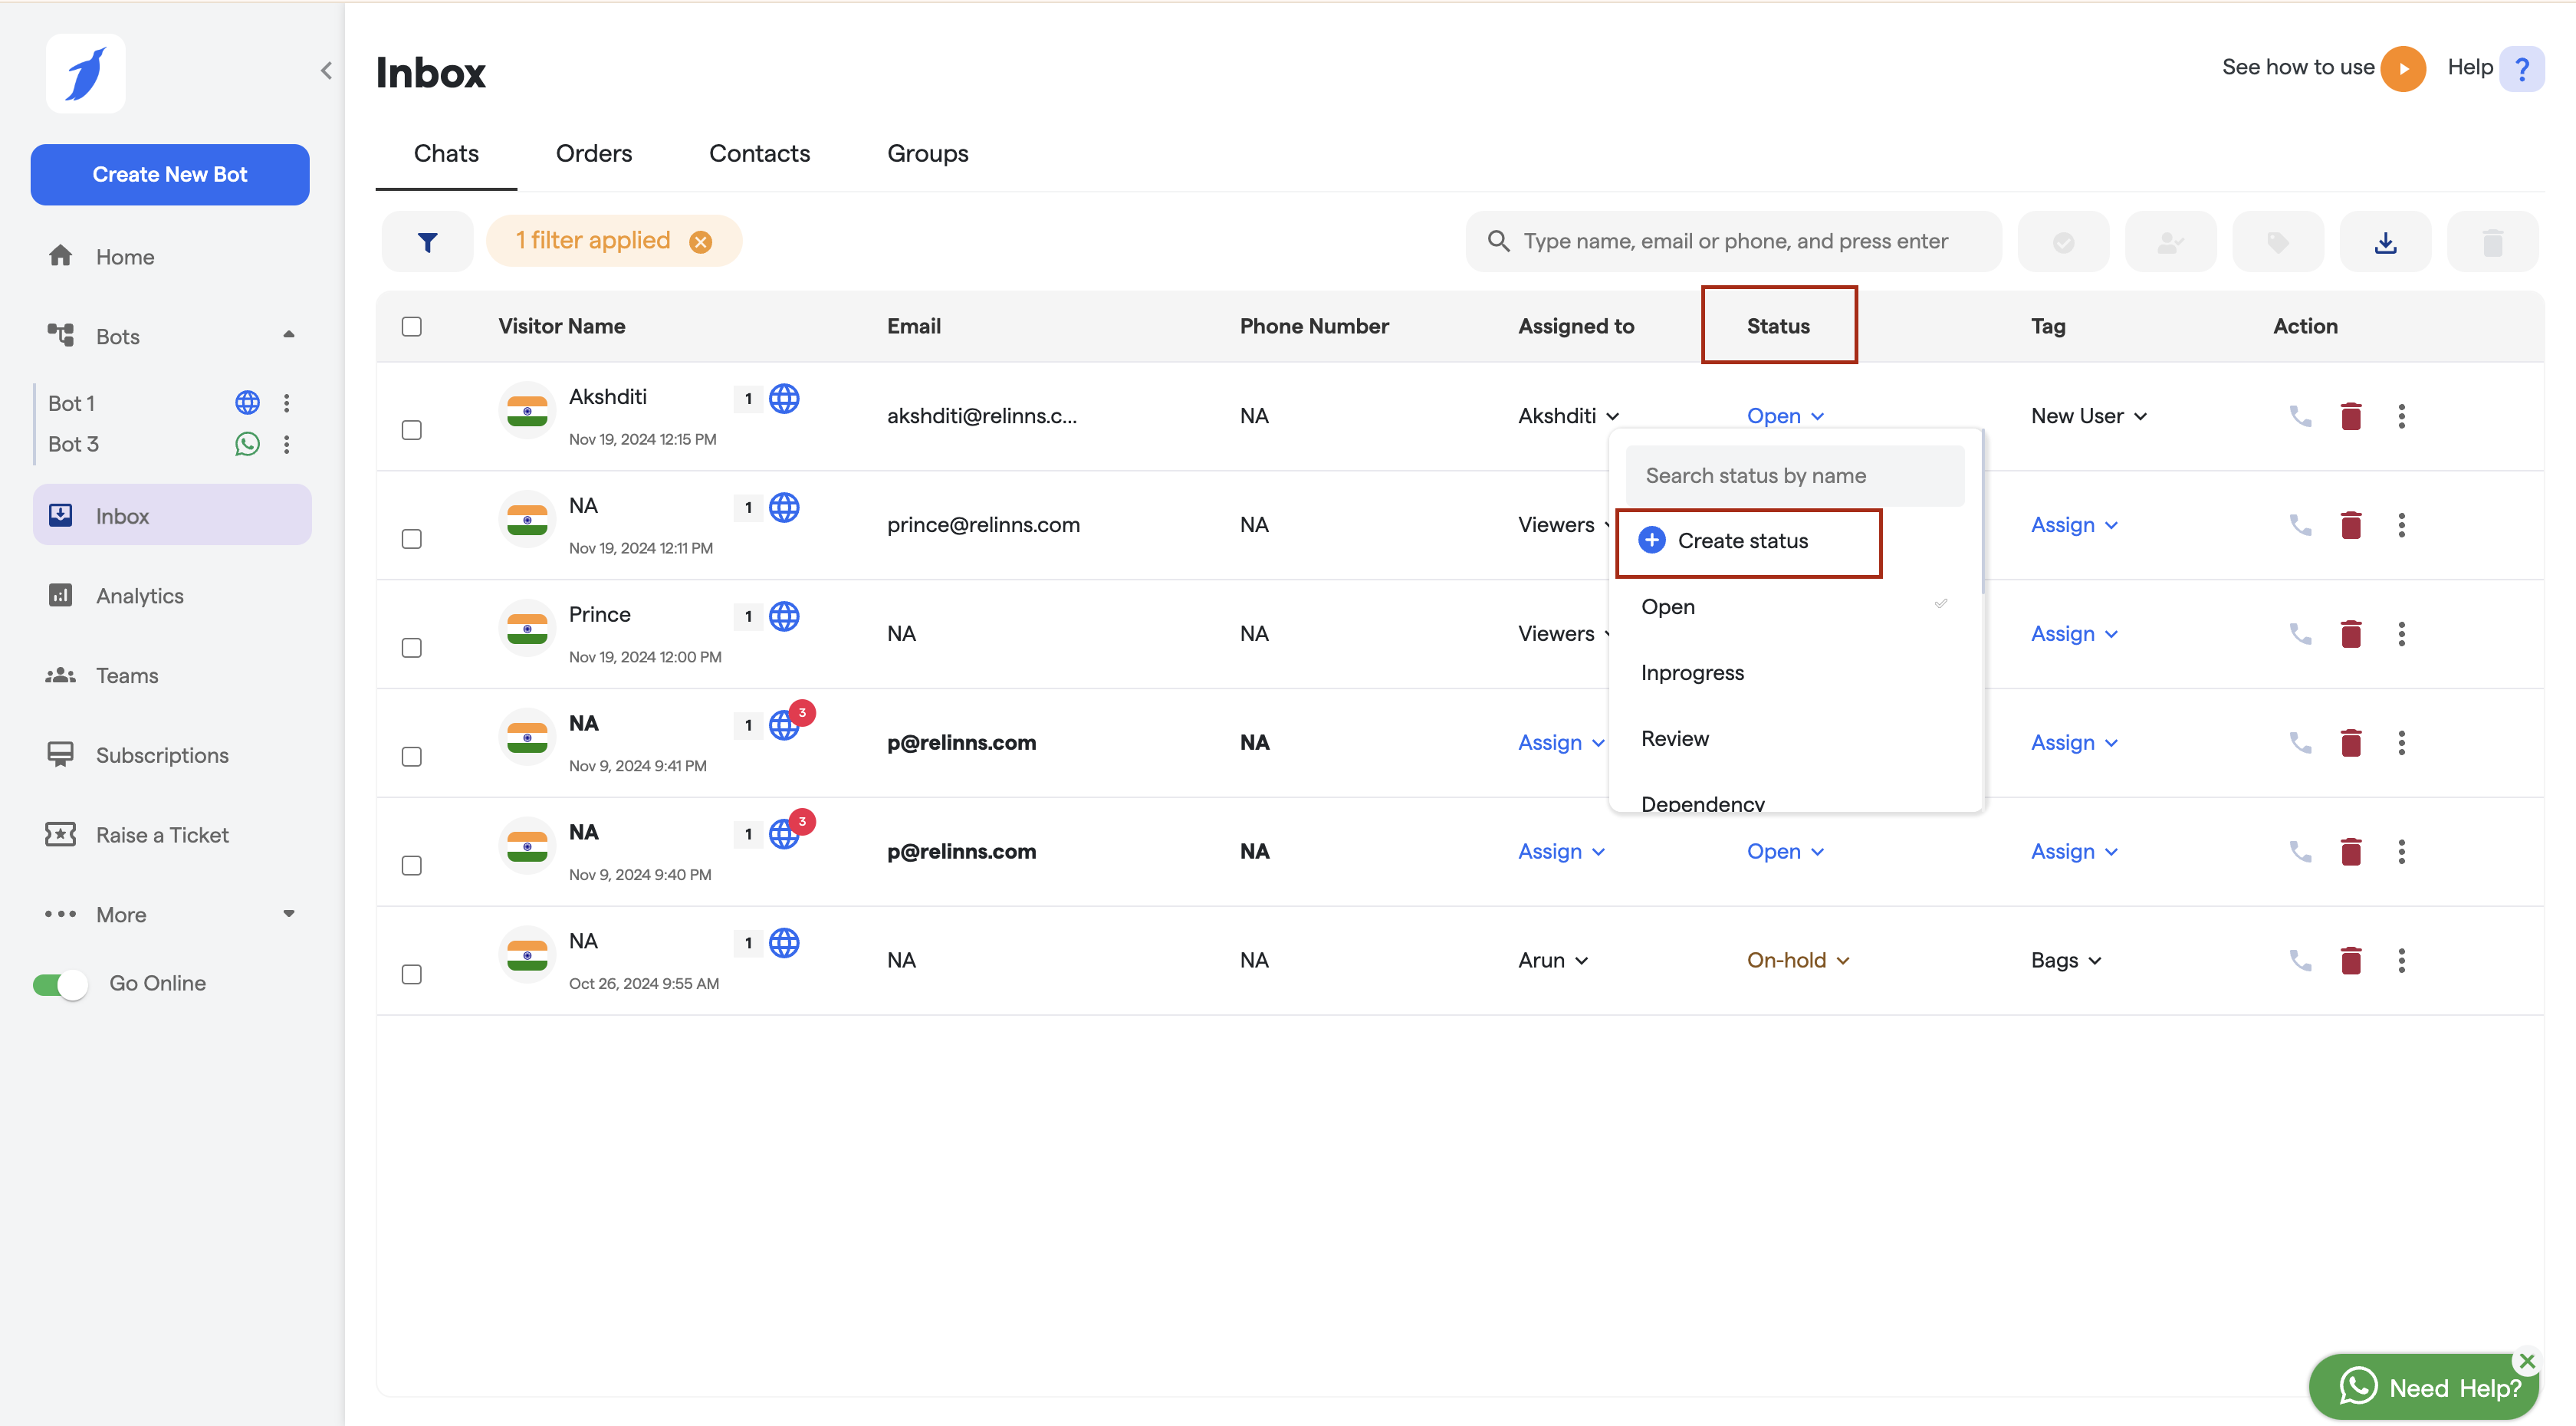
* **Status** - The Status of each chat is a key feature for both individual agents and teams to track the current state of each conversation. It helps to ensure that no chat is left unattended or missed.\
  \
  You can mark status to particular chat from the dropdown or can create a new one as depicted in the screenshot below.

<figure><img src="https://1745791824-files.gitbook.io/~/files/v0/b/gitbook-x-prod.appspot.com/o/spaces%2FAPDb8cKQtGlIAfgHjcsQ%2Fuploads%2F5atSRr5yHvS8Q2YQkIyb%2Fimage.png?alt=media&amp;token=52a86b02-aefe-4be4-b44a-dffed6de70bf" alt=""><figcaption></figcaption></figure>

* **Tags** - Tags are used to assign a specific label or category to a chat, helping agents and team members quickly identify the topic or nature of the conversation. By assigning tags, you can "stamp" a chat with relevant information, making it easier to understand the context.\
  \
  You can assign tags to particular chat from the dropdown or can create a new one as depicted in the screenshot below.

<figure><img src="https://1745791824-files.gitbook.io/~/files/v0/b/gitbook-x-prod.appspot.com/o/spaces%2FAPDb8cKQtGlIAfgHjcsQ%2Fuploads%2Fv1LuK2JJbrTgZRYKr46X%2Fimage.png?alt=media&amp;token=18e7cbfa-7982-48ec-952c-81ed5ef8a850" alt=""><figcaption></figcaption></figure>

* **Assigned** **to** (**Agent**) - The name of the agent to whom the chat is assigned.

<figure><img src="https://1745791824-files.gitbook.io/~/files/v0/b/gitbook-x-prod.appspot.com/o/spaces%2FAPDb8cKQtGlIAfgHjcsQ%2Fuploads%2F7aj0WfoAt2aOjIXHduAs%2Fimage.png?alt=media&amp;token=de047873-4cc9-4013-86f4-4080798f939b" alt=""><figcaption><p>Live Agent</p></figcaption></figure>

### **Some basic Understanding**

{% hint style="info" %}
If the chat appears in bold that means the chat is still unread or the new chats.
{% endhint %}

<figure><img src="https://1745791824-files.gitbook.io/~/files/v0/b/gitbook-x-prod.appspot.com/o/spaces%2FAPDb8cKQtGlIAfgHjcsQ%2Fuploads%2F0YgdkWwoFk0bHv38CXqF%2Fimage.png?alt=media&amp;token=655ad866-3b35-4c4f-b913-521c5178e523" alt=""><figcaption><p>Unread</p></figcaption></figure>

{% hint style="info" %}
If a team member is already in conversation with the customer, then you cannot chat with that user until and unless the chat is transferred to you.
{% endhint %}

<figure><img src="https://1745791824-files.gitbook.io/~/files/v0/b/gitbook-x-prod.appspot.com/o/spaces%2FAPDb8cKQtGlIAfgHjcsQ%2Fuploads%2FsPZ3NJVaoTWBRijdsphs%2Fimage.png?alt=media&amp;token=02b65757-a73b-4368-ba74-8bba3887f379" alt=""><figcaption></figcaption></figure>

### **Step 3: Managing Chats**

**Each chat in the inbox will have options for further action:**

* You can assign tags to categorize or prioritize chats.

<figure><img src="https://1745791824-files.gitbook.io/~/files/v0/b/gitbook-x-prod.appspot.com/o/spaces%2FAPDb8cKQtGlIAfgHjcsQ%2Fuploads%2FZt4mSCW0lCrl1jBHru2a%2Fimage.png?alt=media&amp;token=f150962d-46e3-45a5-9457-d598c14571c4" alt=""><figcaption><p>Tags</p></figcaption></figure>

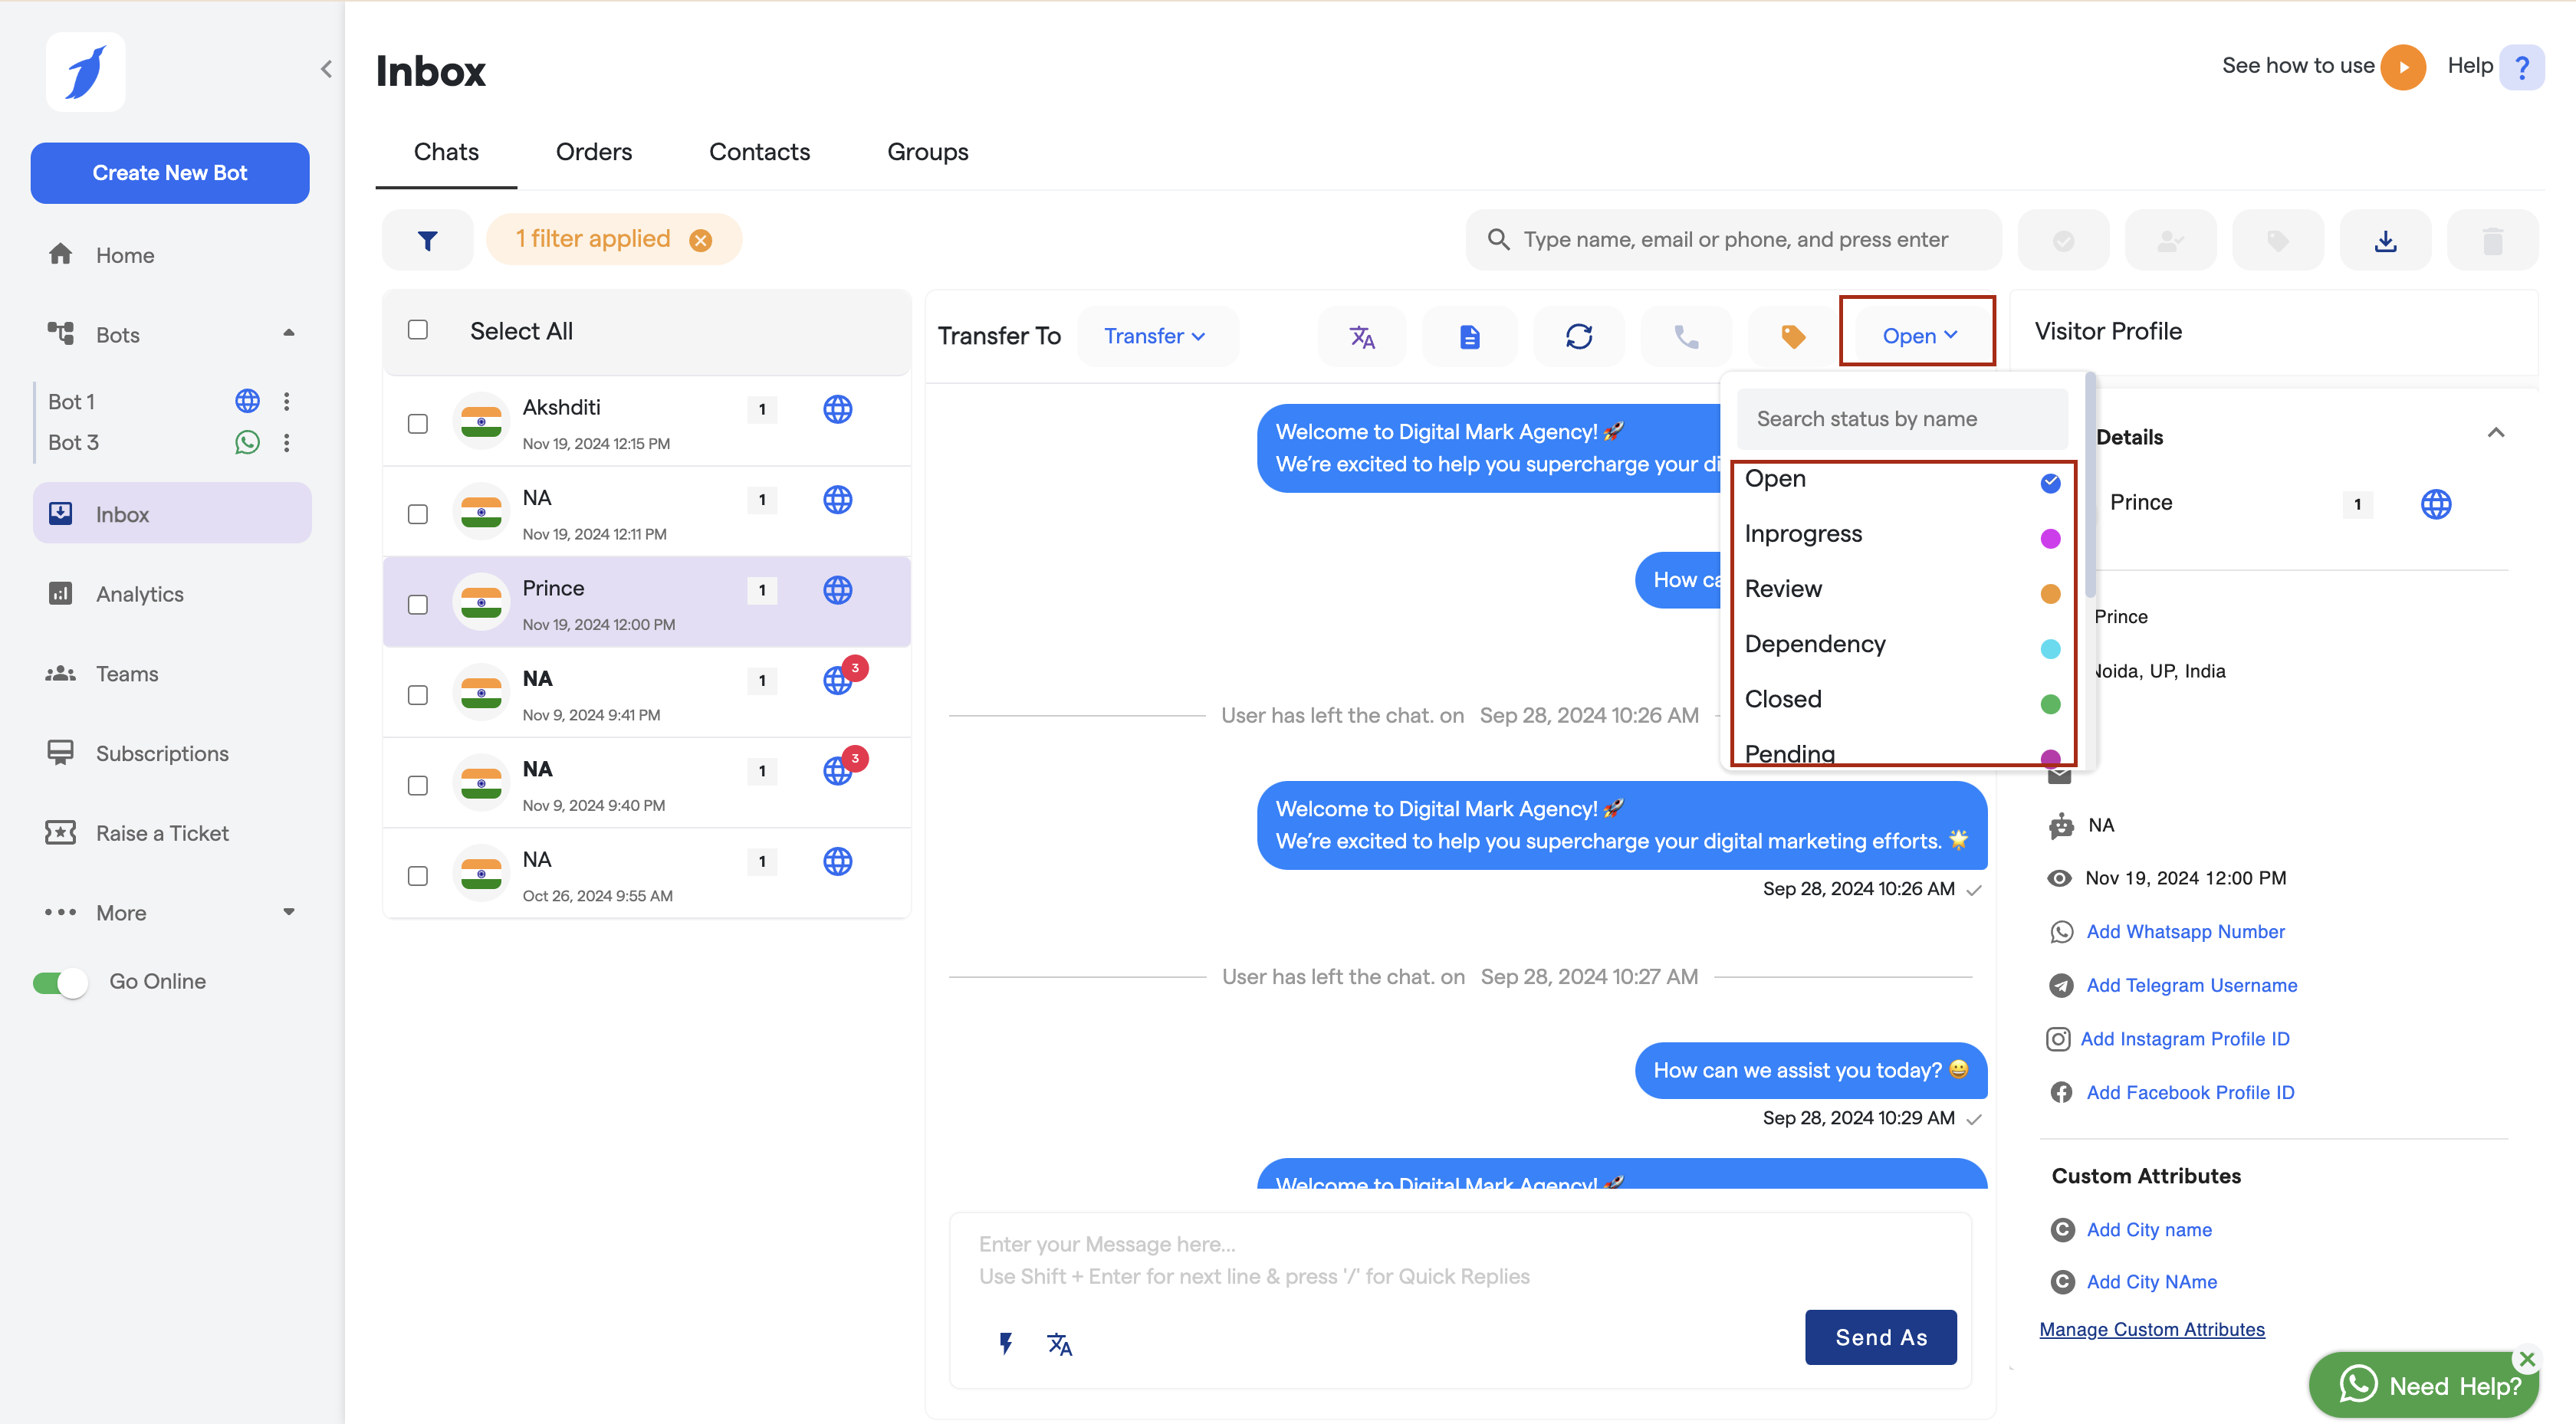
* You can change the status of the conversation (e.g., "Open," "In Progress," or "Resolved").

<figure><img src="https://1745791824-files.gitbook.io/~/files/v0/b/gitbook-x-prod.appspot.com/o/spaces%2FAPDb8cKQtGlIAfgHjcsQ%2Fuploads%2F5Om7k1kkADuiGJddTuAP%2Fimage.png?alt=media&amp;token=6ad4a82e-5d3f-4c4f-845f-1771a5a83d56" alt=""><figcaption></figcaption></figure>

* You can assign the chat to another agent if needed.

<figure><img src="https://1745791824-files.gitbook.io/~/files/v0/b/gitbook-x-prod.appspot.com/o/spaces%2FAPDb8cKQtGlIAfgHjcsQ%2Fuploads%2F0egch22fFDQNgiz21Gzs%2Fimage.png?alt=media&amp;token=64c8d251-f0f0-4e07-aa69-6b1ec58b63cc" alt=""><figcaption></figcaption></figure>

* You can also download the chat transcript from the button given on the top bar.

<figure><img src="https://1745791824-files.gitbook.io/~/files/v0/b/gitbook-x-prod.appspot.com/o/spaces%2FAPDb8cKQtGlIAfgHjcsQ%2Fuploads%2F0be63fwSK9WomFOPJsb6%2Fimage.png?alt=media&amp;token=f853429f-3fdc-461c-96d4-434d1a43b6c8" alt=""><figcaption><p>Chat Transcript</p></figcaption></figure>

* **Transfer to bot -** You can transfer the chat again to the bot once the live chat is over.

<figure><img src="https://1745791824-files.gitbook.io/~/files/v0/b/gitbook-x-prod.appspot.com/o/spaces%2FAPDb8cKQtGlIAfgHjcsQ%2Fuploads%2FXYaN4spitNO8I962zjyk%2Fimage.png?alt=media&amp;token=a169c9c4-18ca-48b0-96d9-3552515a87cf" alt=""><figcaption><p>Bot Transfer</p></figcaption></figure>

### **Step 4:  Filtering Chats in the Inbox**

To make it easier to manage and prioritize chats, we have a **Filters** section in the inbox. You can filter out chats based on various criteria, such as:

* **Date & Time:** Filter chats by the date and time they were received.
* **Tags:** Choose specific tags to view chats related to particular categories, such as product inquiries, support, or sales.
* **Status:** Filter chats based on their status (e.g., Open, In Progress, Resolved).
* **Assigned Agent:** Filter chats to see those assigned to a specific team member.

This filtering functionality allows you to quickly narrow down and focus on specific chats that need attention, ensuring better organization and workflow.

<figure><img src="https://1745791824-files.gitbook.io/~/files/v0/b/gitbook-x-prod.appspot.com/o/spaces%2FAPDb8cKQtGlIAfgHjcsQ%2Fuploads%2FDFkgWzcfliKnXGZG6qjS%2Fimage.png?alt=media&amp;token=9dfe3d7b-ab91-4337-bbce-c9aed2a79a4b" alt=""><figcaption></figcaption></figure>

### **Step 5: Starting a Live Chat**

When a new lead or chat arrives, you will see a notification. You can choose to accept or reject the chat request.

<figure><img src="https://1745791824-files.gitbook.io/~/files/v0/b/gitbook-x-prod.appspot.com/o/spaces%2FAPDb8cKQtGlIAfgHjcsQ%2Fuploads%2FQVZOGLCbU75B1CcTIVPh%2Fimage.png?alt=media&amp;token=2aefff56-33fb-4bea-aba7-258997fd89f6" alt=""><figcaption><p>Notifications</p></figcaption></figure>

* **Accepting a Chat:** Once accepted, you’ll be directed to the chat interface where you can interact with the customer.
* **Rejecting a Chat:** If you reject the chat, the lead will be reassigned or notified as per your agency's settings.

### **Step 6: Interacting with the Customer**

Inside the chat window, you'll have a message bar where you can type and send messages to the customer.&#x20;

<figure><img src="https://1745791824-files.gitbook.io/~/files/v0/b/gitbook-x-prod.appspot.com/o/spaces%2FAPDb8cKQtGlIAfgHjcsQ%2Fuploads%2Fqq5JxsI6XMAGWXM8QHHi%2Fimage.png?alt=media&amp;token=33bb4227-a38d-47ec-9fef-7714de12902c" alt=""><figcaption><p>Chat window</p></figcaption></figure>

Additionally, you can perform the following actions:

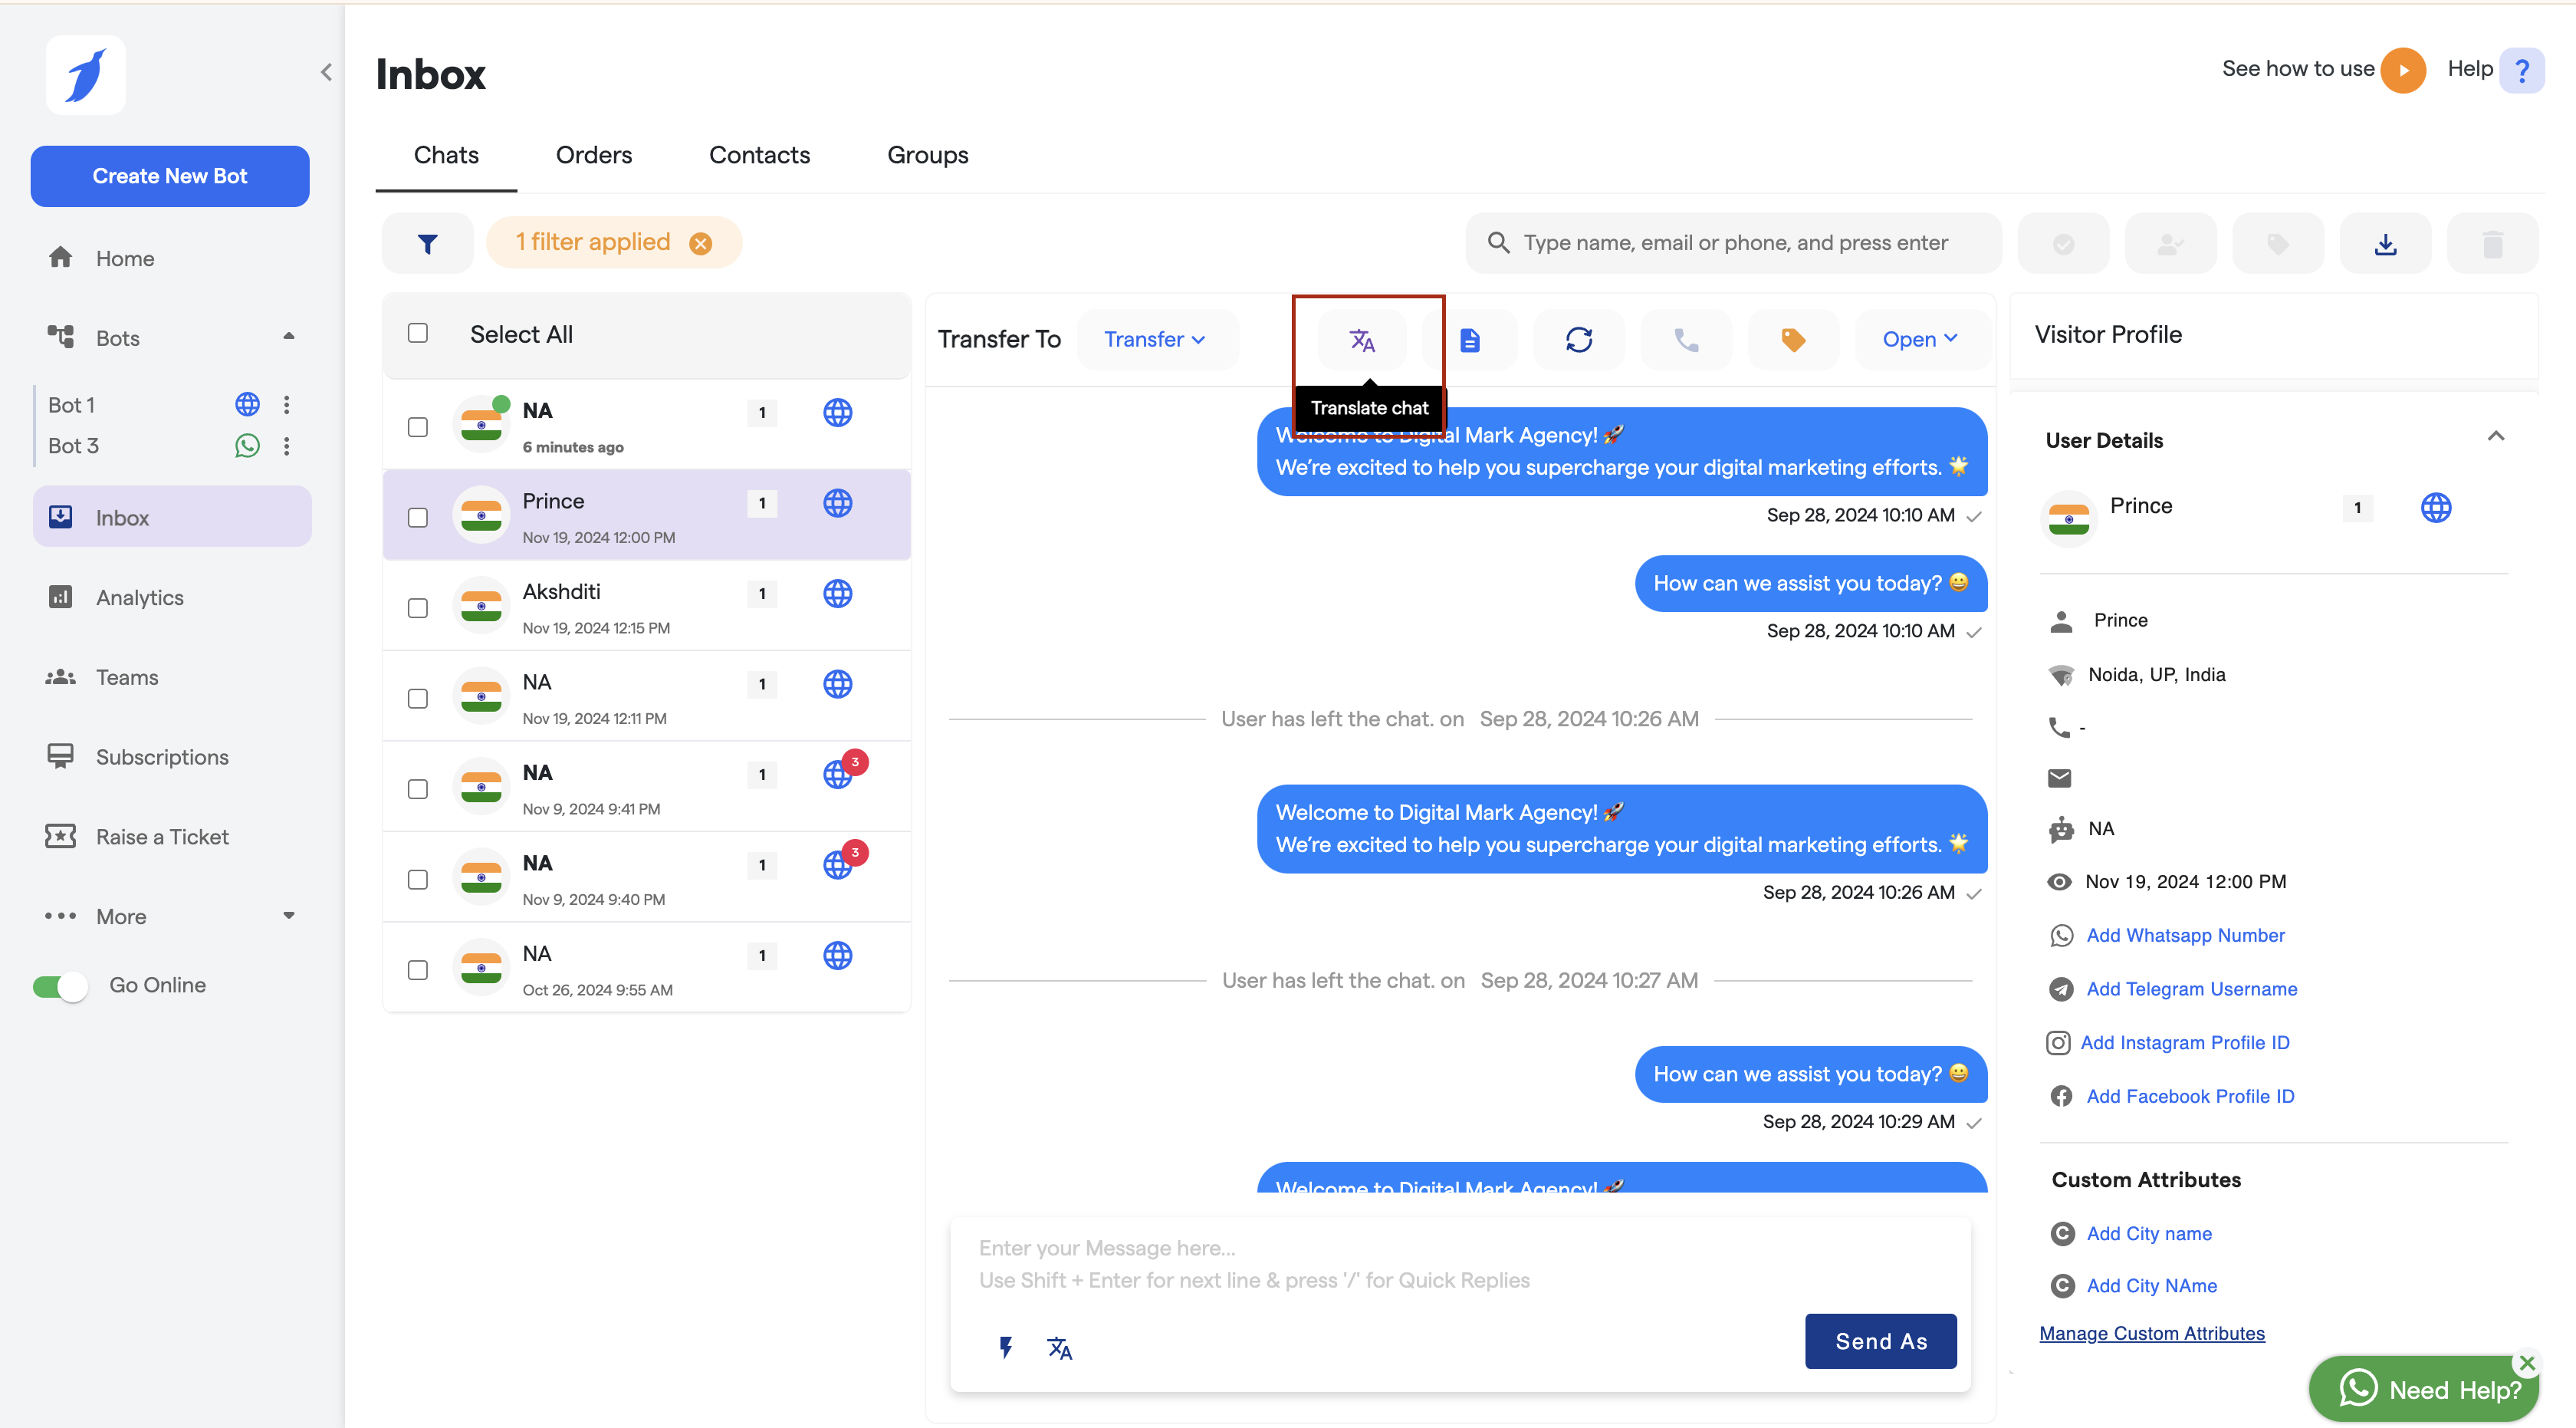
* **Translation:** You can translate the chat to your preferred language using the translate button

<figure><img src="https://1745791824-files.gitbook.io/~/files/v0/b/gitbook-x-prod.appspot.com/o/spaces%2FAPDb8cKQtGlIAfgHjcsQ%2Fuploads%2F3qawzIleQg3NqFm7mZdb%2Fimage.png?alt=media&amp;token=7d8b25fa-9d70-49fe-8470-ff7d6ab9820d" alt=""><figcaption></figcaption></figure>

* **Quick Reply:** Use the quick reply feature for repetitive messages like greetings or common responses. Simply click on "Add New" to create a quick reply, which you can use whenever needed.

<figure><img src="https://1745791824-files.gitbook.io/~/files/v0/b/gitbook-x-prod.appspot.com/o/spaces%2FAPDb8cKQtGlIAfgHjcsQ%2Fuploads%2F9Acu5NjKDeDff15gJsfq%2Fimage.png?alt=media&amp;token=2b7ccf8f-a89c-4db4-9ec1-ee4ea219abc1" alt=""><figcaption><p>Quick Reply</p></figcaption></figure>

### **Step 7: Additional Features**

* **Message Actions:** Click the three dots on any message to access options such as forwarding, starring, copying, or deleting messages.

<figure><img src="https://1745791824-files.gitbook.io/~/files/v0/b/gitbook-x-prod.appspot.com/o/spaces%2FAPDb8cKQtGlIAfgHjcsQ%2Fuploads%2Fq2lbq4i1FVqyXPfKFtHP%2Fimage.png?alt=media&amp;token=0e636833-f66e-49fa-8d53-6248a6696181" alt=""><figcaption></figcaption></figure>

* **Visitor Profile:** View detailed information about the user you are interacting with, including location, phone number, and any custom attributes added.

<figure><img src="https://1745791824-files.gitbook.io/~/files/v0/b/gitbook-x-prod.appspot.com/o/spaces%2FAPDb8cKQtGlIAfgHjcsQ%2Fuploads%2FnoZgtX66YKtdQv1kPgPD%2Fimage.png?alt=media&amp;token=2e768d49-f767-4531-889b-ff1b6b1f9309" alt=""><figcaption></figcaption></figure>

* You can also edit these information by clicking on the edit icon and then save them by clicking on the save icon given.

<figure><img src="https://1745791824-files.gitbook.io/~/files/v0/b/gitbook-x-prod.appspot.com/o/spaces%2FAPDb8cKQtGlIAfgHjcsQ%2Fuploads%2FVwOkbUjSlFuSNoqE10rs%2Fimage.png?alt=media&amp;token=e67ba019-b790-427b-b6c2-c73c6a99c584" alt=""><figcaption><p>Vistor's Profile</p></figcaption></figure>

This guide provides a comprehensive overview of how a live agent can access and effectively use the Inbox panel to manage chats efficiently.